Augmatic GRE
User Manual
For software version 1.2 - March 30, 2026 - Changelog.
AUv3 and VST3 MIDI Drum Pattern Generator for iPad, iPhone, macOS, and Windows.
Contents
- Introduction
- Compatible Hosts
- Getting Started
- Built-in Tutorial
- Interface Overview
- Topographic XY Map
- Master Sliders
- Pattern Tab
- Topographic Engine
- Blend
- Euclidean Engine
- Groove Tools
- Linear Tab
- Velocity Tab
- Note Tab
- Settings
- Preset System
- MIDI Signal Flow
- DAW Automation
- Standalone Mode
- File Storage
- Tips and Workflows
Introduction
Augmatic GRE generates evolving drum patterns using proven musical algorithms. Morph through endless rhythmic variations that naturally balance simplicity and complexity — without tedious manual programming.
Augmatic GRE is an AUv3 and VST3 plugin and standalone app that generates MIDI notes for any software or hardware drum sampler or synth that accepts MIDI input. It does not produce audio.
Main Features
- 6 algorithmic channels — bass drum, snare, hi‑hat, plus accent and ghost variations
- Topographic Engine — for morphable, evolving beats — based on the Mutable Instruments Grids Eurorack module
- Euclidean engine — for evenly distributed, world‑rhythm patterns
- Blend control — to mix Topographic and Euclidean styles
- Linear Drumming — no two drum hits occur at the same time
- Velocity Bender — for a more expressive, dynamic pulse
- Groove tools — swing, humanization, clock division, and timing shift
Instrument Channels
| Channel | Label | Default Name | Purpose |
|---|---|---|---|
| 1 | BD | Bass Drum | Primary bass drum — drives the main beat |
| 2 | SN | Snare | Primary snare — drives the backbeat |
| 3 | HH | Hi-Hat | Primary hi-hat — drives the pulse |
| 4 | BD' | BD Accent | Independent bass drum accent — ghost notes, rimshots (own density/chaos) |
| 5 | SN' | SN Accent | Independent snare accent — ghost hits, cross-sticks (own density/chaos) |
| 6 | HH' | HH Accent | Independent hi-hat accent — open hats, bells (own density/chaos) |
Each channel can use either of two pattern engines:
- Topographic Engine — Based on the Mutable Instruments Grids Eurorack module. Morphs between pre-programmed drum patterns using XY Map coordinates.
- Euclidean Sequencer — Distributes pulses evenly across steps using the Bjorklund algorithm. Produces rhythms found in traditional music worldwide.
Both engines run in parallel. A per-channel Blend control mixes between them, and you can assign different engines to different channels.
Compatible Hosts
Augmatic GRE is available as an AUv3 MIDI Processor (aumi type) on iPad, iPhone, and macOS, and as a VST3 instrument plugin on macOS and Windows.
AUv3 Hosts (iPad, iPhone, macOS)
AUM, Cubasis 3, Drambo, Loopy Pro, Logic Pro, GarageBand, and more.
VST3 Hosts (macOS, Windows)
Ableton Live, FL Studio, Reaper, Cubase, Bitwig Studio, Studio One, and more.
Load it as an Instrument, then route its MIDI output to a drum sampler or synthesizer on another track.
Getting Started
AUv3 (iPad, iPhone, macOS)
- Install — Download Augmatic GRE from the App Store
- Launch the standalone app once — this registers the AUv3 extension with the system
- Open your host (Logic Pro, AUM, Cubasis, etc.)
- Add Augmatic GRE in a MIDI effect or MIDI source slot
- Route MIDI output to a drum instrument
- Press Play — patterns generate and MIDI notes flow to your instrument
VST3 (macOS, Windows)
- Install — Run the installer (
.pkgon macOS,.exeon Windows) - Open your DAW (Ableton Live, FL Studio, Reaper, Cubase, etc.)
- Add Augmatic GRE as a VST3 instrument
- Route MIDI output to a drum instrument on another track
- Press Play — patterns generate and MIDI notes flow to your instrument
The plugin syncs to your host's transport: BPM, play/stop, and timeline position. All parameters can be automated from your DAW.
New to Augmatic GRE? The built-in tutorial walks you through every feature with interactive, hands-on examples. It opens automatically on first launch, or start it anytime from Settings → BUILT-IN TUTORIAL, or by loading any preset from the [Factory] Tutorial Presets folder in the Preset Browser.
Built-in Tutorial
Augmatic GRE includes an interactive tutorial that walks you through every feature using hands-on examples. Each tutorial preset demonstrates a specific control — load it, read the floating instructions, and experiment with the control while the overlay stays visible.
Starting the Tutorial
- First launch — The tutorial opens automatically when the plugin is first installed. You can close it at any time and return to it later.
- Settings → BUILT-IN TUTORIAL — Click the gear icon, then click BUILT-IN TUTORIAL in the right panel.
- Preset Browser — Open the browser and navigate to [Factory] Tutorial Presets. Load any preset to start from that topic.
Navigating
The tutorial overlay has < and > chevron buttons at the bottom to step through tutorials in order. You can also close the overlay (X button) and continue using the plugin — the preset stays loaded.
What’s Covered
The tutorials are organized by tab:
- PATTERN — Density, Chaos, XY Map, Accent channels, Steps & Pulses, Blend, Swing, Shift, Humanize, Clock
- LINEAR — Linear Drumming matrix, Beat Monitor, Probability, Mute, Solo
- VELOCITY — Level, Random, Bender
- NOTE — MIDI note assignment, MIDI mappings
Each tutorial switches to the relevant tab automatically and positions the overlay so the demonstrated control is visible.
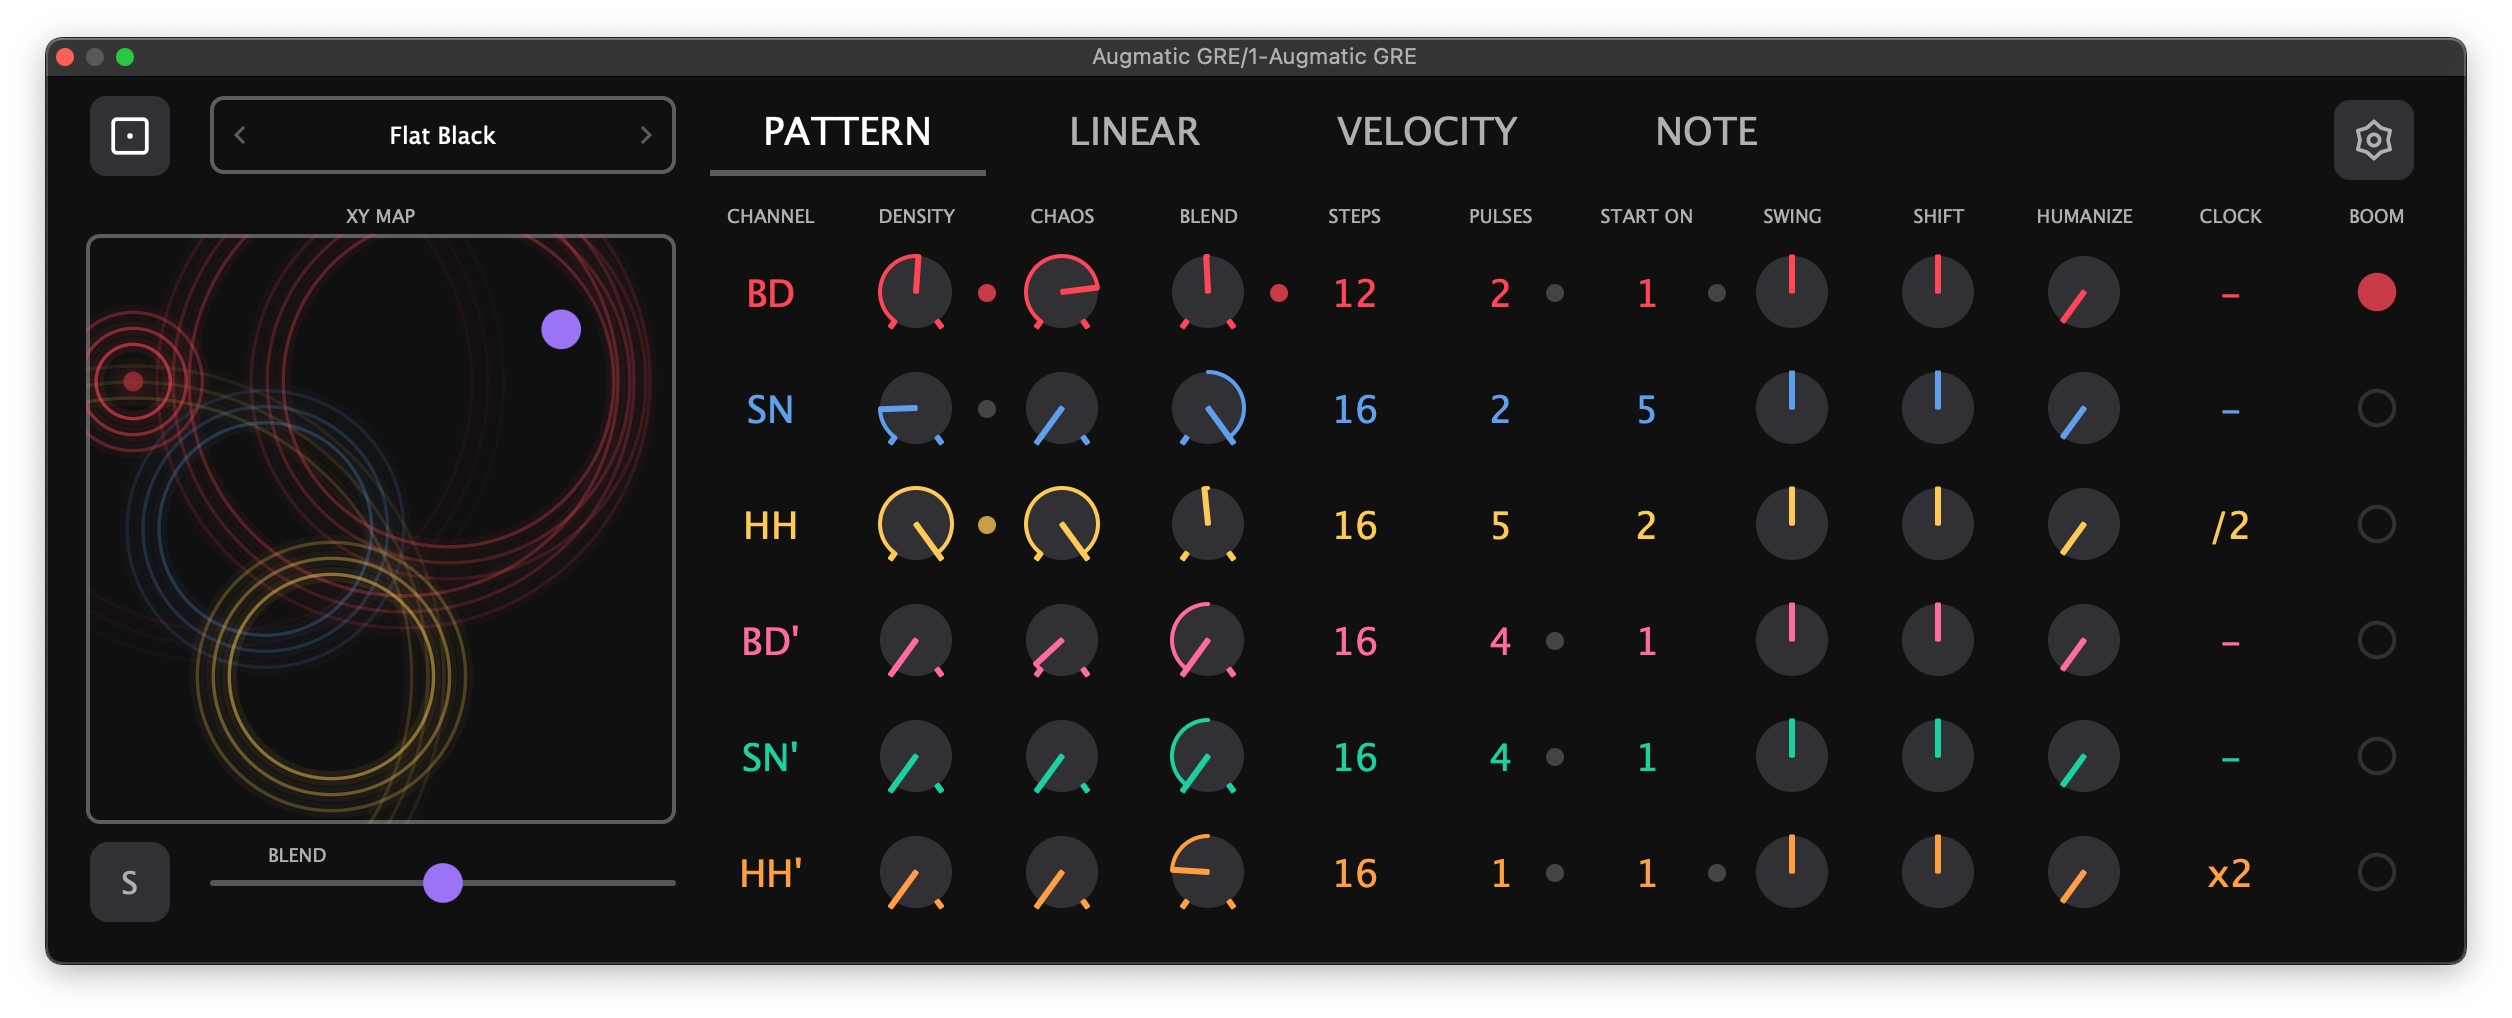
Interface Overview
The plugin interface has four tabs: Pattern, Linear, Velocity, and Note. Settings is accessed via the gear icon in the tab bar.
The left side of the interface contains:
- Preset panel (top) — load, save, and navigate presets
- XY Map (center) — tap and drag to control the map in two dimensions. Can be replaced by the Master Sliders panel
The right side shows the active tab's controls, organized as a grid with one row per instrument channel (BD, SN, HH, BD', SN', HH').
The LED header displays drum onomatopoeia (e.g., “BOOM”, “TCHAK”, “TSS”). Tap an LED pad to trigger that instrument and update the header text.
Beat Monitor — small animated dots appear next to knobs across all tabs. They flash in the instrument’s color when a beat is generated or passes through that processing stage, or gray when blocked. This provides at-a-glance visual feedback of the signal flow without needing to listen. Beat Monitor can be toggled on/off in Settings.
Topographic XY Map
XY coordinates of the Topographic Map are global controls that affect all drum channels simultaneously. They select a position within the Topographic Engine pattern nodes. Changing XY coordinates changes the underlying rhythmic character of every channel (BD, SD, HH, BD', SD', HH') at once. Values between grid points blend adjacent patterns smoothly.
All other controls on the Pattern tab — Density, Chaos, Blend, Euclidean parameters, Swing, Shift, Humanize, and Clock Divider — are individual per channel, allowing you to shape each drum voice independently.
Master Sliders
Master Sliders provide global control over groups of per-channel knobs. Toggle the Master Sliders panel using the button next to the XY Map — the panel replaces the XY Map display. One Master Slider is always visible below the XY Map (configurable in Settings).
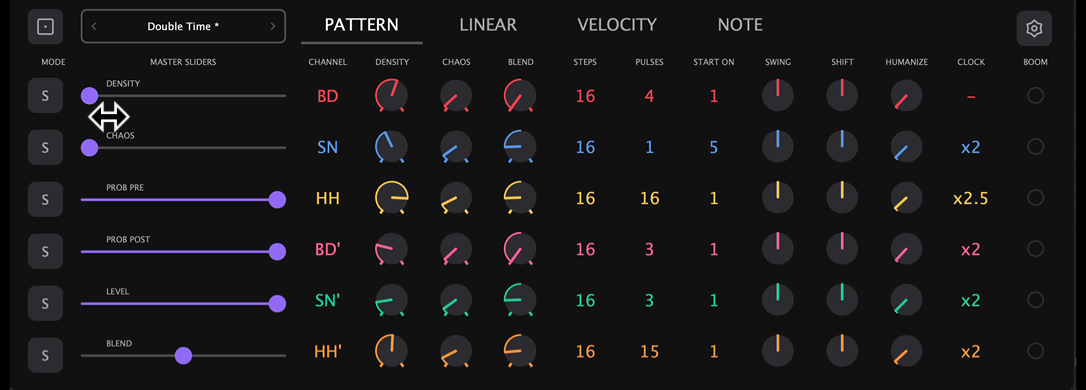
Available Sliders
| Slider | Range | Default | Controls |
|---|---|---|---|
| Density | 0–255 | 0 | Per-channel Density knobs |
| Chaos | 0–127 | 0 | Per-channel Chaos knobs |
| Blend | 0.0–1.0 | 0.5 | Per-channel Blend knobs (bipolar) |
| Prob Pre | 0–100% | 100% | Per-channel Probability Pre knobs |
| Prob Post | 0–100% | 100% | Per-channel Probability Post knobs |
| Level | 1–127 | 127 | Per-channel Velocity Level knobs |
Hard / Soft Mode
Each slider has an H/S toggle button:
- Hard mode (H) — overrides all per-channel knobs to the master’s value. Individual knob positions are ignored — all channels show the same value.
- Soft mode (S) — scales each per-channel knob relative to its individual base value. Each channel retains its own setting and responds independently to master movement. This is the default mode.
Double-click a slider to reset it to its default value and switch to Soft mode.
Limit Ticks
When a Master Slider is active, per-channel knobs show Limit Ticks — two small marks on the knob arc indicating the effective range defined by the master slider.
- In Soft mode, ticks show where the master constrains the knob — the knob’s effective value cannot move past this boundary
- In Hard mode, ticks spread to min/max showing the full range is available
- Blend knobs show two moving ticks (floor and ceiling) reflecting the bipolar constraint
Limit Ticks can be hidden in Settings (Limit Tick toggle).
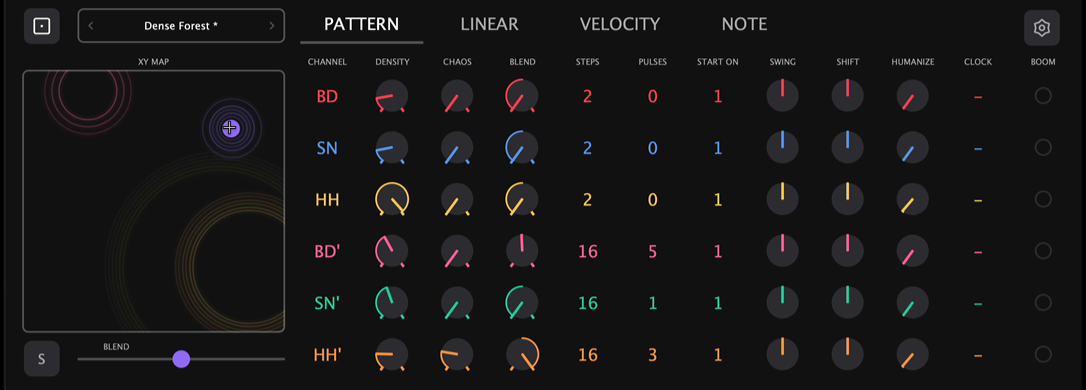
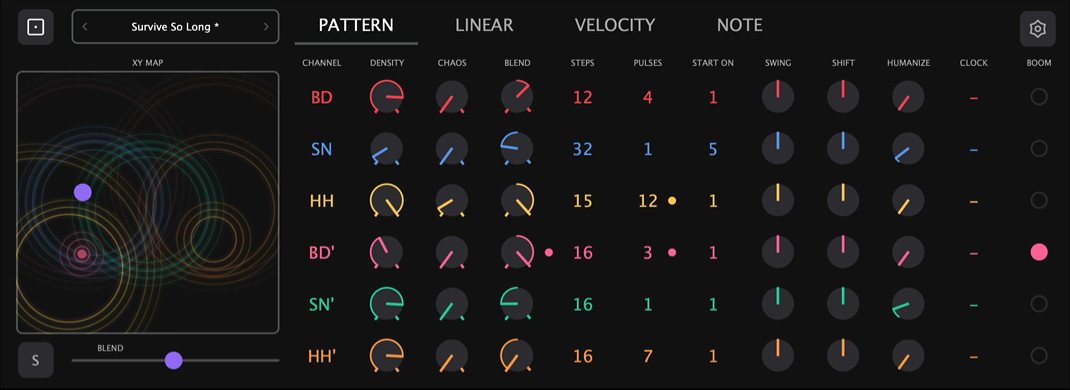
Pattern Tab
The PATTERN tab controls how drum patterns are generated. Each instrument channel has independent controls across multiple columns.
Topographic Engine
The Topographic Engine is a port of the Mutable Instruments Grids Eurorack module. It contains pre-programmed pattern nodes arranged in a grid. Each node stores three distinct rhythmic layers — bass drum, snare, and hi-hat — designed to work together musically.
When you move the XY coordinates, the engine smoothly blends between the four surrounding nodes using bilinear interpolation, creating an infinite continuum of rhythmic variations. The nodes are arranged in a curated musical topology, so adjacent positions morph between complementary drum styles rather than jumping abruptly.
Each step in a pattern has a level value (0–127) that represents how strongly that drum hit “wants” to play. The Density control acts as a threshold: only steps whose level exceeds the threshold will trigger. This is why increasing Density gradually adds hits in a musically meaningful order — the strongest beats appear first, then fills and ghost notes emerge as you push higher.
Main and Accent Channels
Augmatic GRE runs six independent instances — one per channel. All six share the same XY position and draw from the same pattern data, but each has its own Density and Chaos controls.
This means accent channels produce complementary rhythms, not duplicates. At the same XY position, a BD' accent with Density 20 triggers different steps than the main BD with Density 64, because the density threshold filters different hits from the same underlying pattern. The strongest beats play on the main channel; the weaker, in-between hits emerge on the accent channel.
- Main channels (BD, SN, HH) — carry the primary beat. Set Density to taste (typically 40–90).
- Accent channels (BD', SN', HH') — add ghost notes, rimshots, or alternative articulations. Default Density is 0 (silent). Increase to 10–25 to start hearing accents.
Assign accent channels to different MIDI notes than their parent (e.g., BD=bass drum, BD'=rimshot) to trigger alternative drum sounds on the accent hits.
In the original Mutable Instruments Grids hardware, accent outputs fire on the strongest hits in a pattern — those with an internal level above 192 (out of 255). To replicate this behavior in Augmatic GRE, set the accent channel's Density to ≈25%. Lower values produce a sparser pattern; higher values include weaker hits and output a busier pattern than the original implementation.
Density
Controls how many notes each instrument generates. Higher density = more notes.
- 0: No notes
- 64: Medium density (roughly half the available pattern steps trigger)
- 127: Maximum density (all available steps trigger)
Accent channels default to 0. Increase them to 10–25 to start hearing accent notes.
Chaos
Adds controlled randomness to patterns, creating variations in timing and velocity.
- Per-channel Chaos (0–127, default 0): Independent control per instrument.
Impact of Chaos control:
- 0: Mechanical precision, no variation
- 5–15: Subtle humanization
- 30–50: Noticeable groove variation
- 80–127: Unpredictable, experimental
The Chaos Master Slider controls all per-channel Chaos knobs simultaneously, with Hard/Soft mode support like all other Master Sliders.
Blend (Topographic <> Euclidean)
A per-channel control that mixes between the two pattern engines:
- 0.0 (left): 100% Topographic Engine
- 0.5 (center): 50/50 mix — each note randomly picks from either engine
- 1.0 (right): 100% Euclidean Sequencer
Default: 0.0 (XY Map) for all channels.
Euclidean Engine
Each channel has three Euclidean parameters:
- Steps (2–32, default 16): Pattern length in 16th notes
- Pulses (0 to Steps, default 4): Number of hits distributed evenly across the pattern
- Start On (1 to Steps, default 1): Which step the pattern starts on. Start On = 1 means the first hit lands on beat 1 (no shift). Start On = N shifts the pattern to the right so the first hit lands on step N.
The Bjorklund algorithm distributes pulses as evenly as possible, creating rhythms found in traditional music:
| Notation | Steps | Pulses | Style | Description |
|---|---|---|---|---|
| E(8,3) | 8 | 3 | Cuban | Tresillo — fundamental Cuban rhythm |
| E(8,5) | 8 | 5 | Afro-Cuban | Cinquillo — classic clave-like pattern |
| E(12,5) | 12 | 5 | Afro-Cuban | Son clave variation |
| E(12,7) | 12 | 7 | West African | Traditional bell pattern |
| E(16,5) | 16 | 5 | Latin | Rumba clave stretched to 16 steps |
| E(16,7) | 16 | 7 | Modern | Dense, complex polyrhythm |
| E(13,5) | 13 | 5 | West African | Classic African bell pattern |
| E(16,9) | 16 | 9 | Electronic | Modern electronic pattern |
Visual pattern examples:
E(16,4) Start On=1:  X . . . X . . . X . . . X . . .
E(16,4) Start On=3:  . . X . . . X . . . X . . . X .
E(8,3)  Start On=1:  X . . X . . X .
E(16,1) Start On=1:  X . . . . . . . . . . . . . . .
Auto-clamping: When you reduce Steps, Pulses and Start On are automatically clamped to valid ranges. For example, reducing Steps from 16 to 8 clamps Pulses from 12 to 8 and Start On from 10 to 8.
Interaction: Drag vertically on STEPS, PULSES, or START ON to scroll through values. Fast swipes use kinetic scrolling with momentum. Values commit on finger release, so dragging previews the value without changing the parameter mid-playback. Double-tap any value to reset it to its default.
The START ON Beat Monitor dot flashes once per Euclidean cycle on the starting step, providing a visual indicator of the loop boundary.
Groove Tools
Swing
Per-channel swing timing based on the Roger Linn algorithm.
- Range: −99.0 to +99.0 (0.1 step precision)
- Default: 0 (straight timing)
- Positive values delay the off-beat 16th notes, creating a classic shuffle/swing feel
- Negative values push the off-beat 16th notes earlier, creating a rushing feel
- Higher absolute values produce more pronounced swing
Shift
Per-channel post-processing delay that moves notes forward or backward in time. Both directions use a PPQ lookup table to delay notes by precise amounts. Forward shift (values below center) uses larger delay values so that notes land just before the next cycle, creating the effect of playing ahead of the beat.
- Range: 0.0–126.0 (63.0 = center/off, 0.1 step precision)
- Default: 63 (no shift)
- Values below 63: notes play earlier (larger delay wraps notes to land before the next beat)
- Values above 63: notes play later (direct delay)
Shift is processed after the Linear Drumming Matrix — only winning notes are shifted.
Humanize
Per-channel random timing variation that adds a human feel.
- Range: 0.0–127.0 (0.1 step precision)
- Default: 0 (no humanization)
- Higher values add more random timing offset to each note
Clock Divider
Per-channel tempo multiplier/divider that changes the playback speed of each instrument independently.
18 ratios available, from /8 (8x slower) through x1 (normal, default) to x8 (8x faster): /8, /7, /6, /5, /4, /3, /2, /1.5, x1, x1.5, x2, x2.5, x3, x4, x5, x6, x7, x8.
Note Length
Global setting that controls how long each MIDI note lasts (the gap between NOTE ON and NOTE OFF).
| Setting | Duration |
|---|---|
| 4n | Quarter note |
| 8n | Eighth note |
| 16n | Sixteenth note (default) |
| 32n | Thirty-second note |
| 64n | Sixty-fourth note |
Beat Monitor on the Pattern Tab
Five dots per channel row, positioned between knob columns:
- Density dot — flashes when the Topographic engine generates a note from density alone (the pattern value exceeds the threshold before chaos perturbation)
- Chaos dot — flashes when a note fires only because chaos randomization pushed the value over the threshold. Without chaos, this step would have been silent — highlighting exactly where randomness is contributing to the pattern
- Blend dot — flashes when a note passes through all stages to final output (whether it came from Topographic, Euclidean, or the probabilistic blend between them). Gray when Blend blocked the note
- Pulses dot — flashes when the Euclidean engine generates a note at this step
- Start On dot — flashes once per Euclidean cycle on the starting step only, showing the beginning of the Euclidean loop
Linear Tab
The LINEAR tab controls the MIDI signal flow through a 12-column matrix. It provides probability filtering, mute/solo controls, and a 6-level priority system for resolving simultaneous notes.
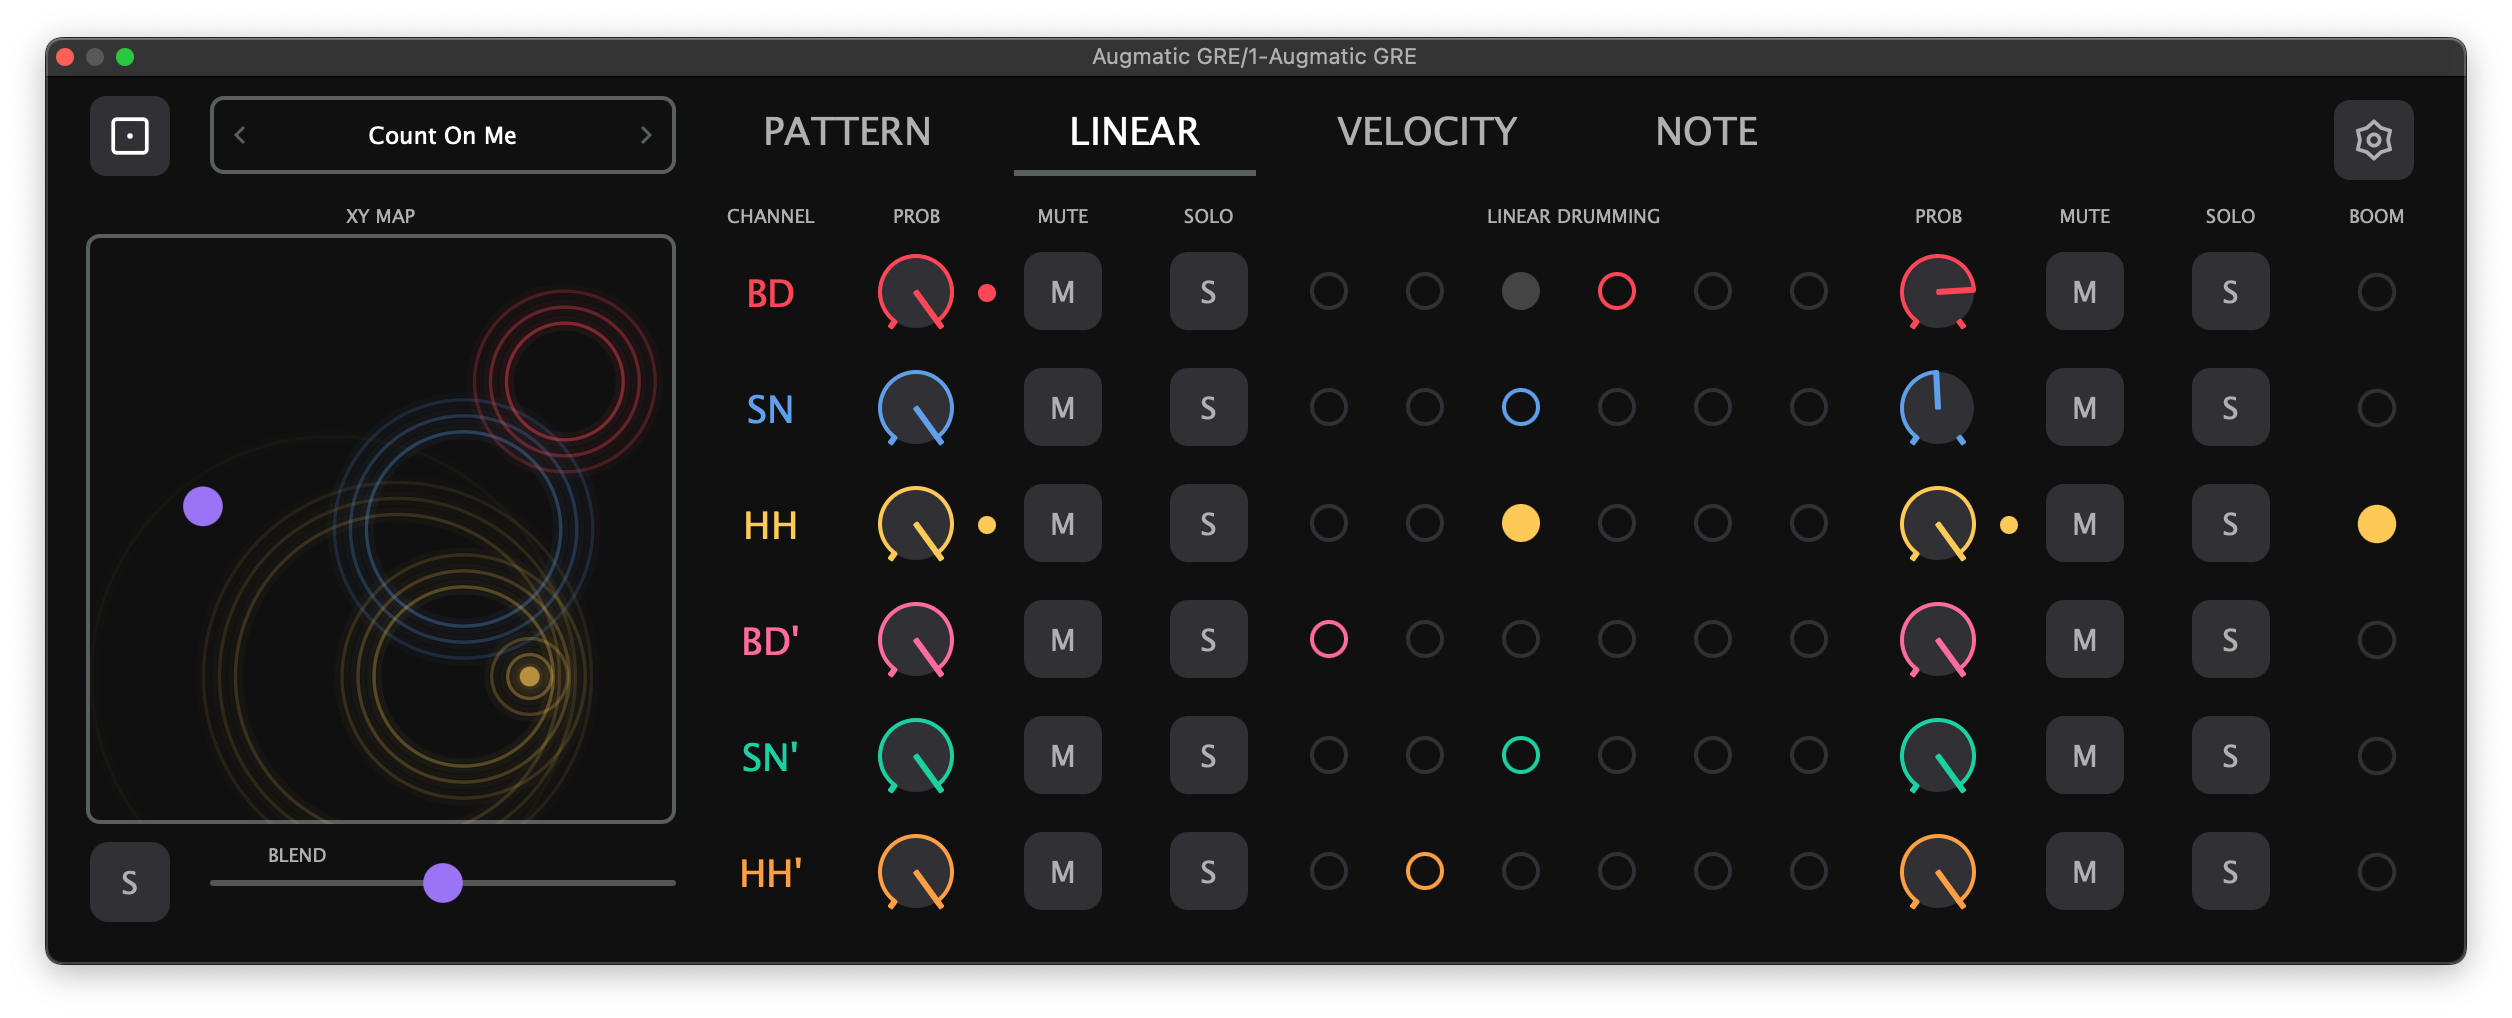
Probability Pre / Probability Post
PROB Knobs (0–100%) randomly filter notes.
- Probability Pre: Filters notes before priority processing. Removed notes are as if they never happened — other instruments fill naturally.
- Probability Post: Filters notes after priority processing. Creates gaps in the pattern.
- 100% (default): All notes pass through
- 50%: Roughly half the notes are randomly removed
- 0%: All notes blocked
When using both, probabilities multiply: Probability Pre=80% and Probability Post=50% means roughly 40% of notes survive.
Mute Pre / Mute Post
Toggle buttons that silence instruments.
- Mute Pre: Mutes before priority. Other instruments continue normally (no holes).
- Mute Post: Mutes after priority. Leaves holes where the instrument would have played.
- Mute Pre and Solo Pre are mutually exclusive per instrument. Enabling one disables the other.
- Mute Post and Solo Post are mutually exclusive per instrument. Enabling one disables the other.
- Mute Pre and Mute Post can both be active on the same instrument.
Solo Pre / Solo Post
Toggle buttons that isolate instruments.
- Solo Pre: When any Solo Pre is enabled, only Solo Pre-enabled instruments play. Bypasses priority filtering.
- Solo Post: Solos after priority processing. Shows gaps from priority muting.
- Solo Pre and Mute Pre are mutually exclusive per instrument. Enabling one disables the other.
- Solo Post and Mute Post are mutually exclusive per instrument. Enabling one disables the other.
- Solo Pre and Solo Post can both be active on the same instrument.
- If any solo is enabled, all non-soloed instruments are muted.
Linear Drumming Matrix
Determines which instrument wins when multiple notes trigger simultaneously.
- Each instrument has exactly one priority level. Left side = higher priority
- When notes collide, only the highest-priority instrument plays
- Lower-priority instruments are muted for the duration set by Linear Grid (see Settings Tab)
Interaction: Tap a cell to set an instrument's priority. Tap and drag across cells to paint priorities in one gesture. Double-tap a column to assign all instruments to that priority level.
Same priority: If two instruments share the same priority level, both play at the same time. Setting all instruments to the same priority effectively disables priority filtering.
Beat Monitor on the Linear Tab
Visualizes each stage of the signal chain as notes pass through or get blocked by another higher-priority channel:

- Probability Pre dot — flashes in instrument color when the note passes the random probability check, gray when filtered out before priority processing
- Priority matrix cells:
- Unselected cells (instruments not assigned to that priority level) show a gray circle outline
- Selected cells (the instrument’s assigned priority) show an instrument-color circle outline when idle
- Pass animation: when a note passes through Linear Drumming priority (this instrument wins), the selected cell fills with the instrument’s color (brief hold then fade)
- Block animation: when instrument B is blocked by instrument A (A has higher priority and both fired at the same time), the cell at B’s row, A’s priority column blinks gray — showing you exactly which instrument caused the block and at which priority level
- Probability Post dot — flashes when the post-priority probability check passes, gray when filtered. Only fires for notes that survived all prior stages
Velocity Tab
The VELOCITY tab controls the output velocity (volume/intensity) of each instrument's MIDI notes.
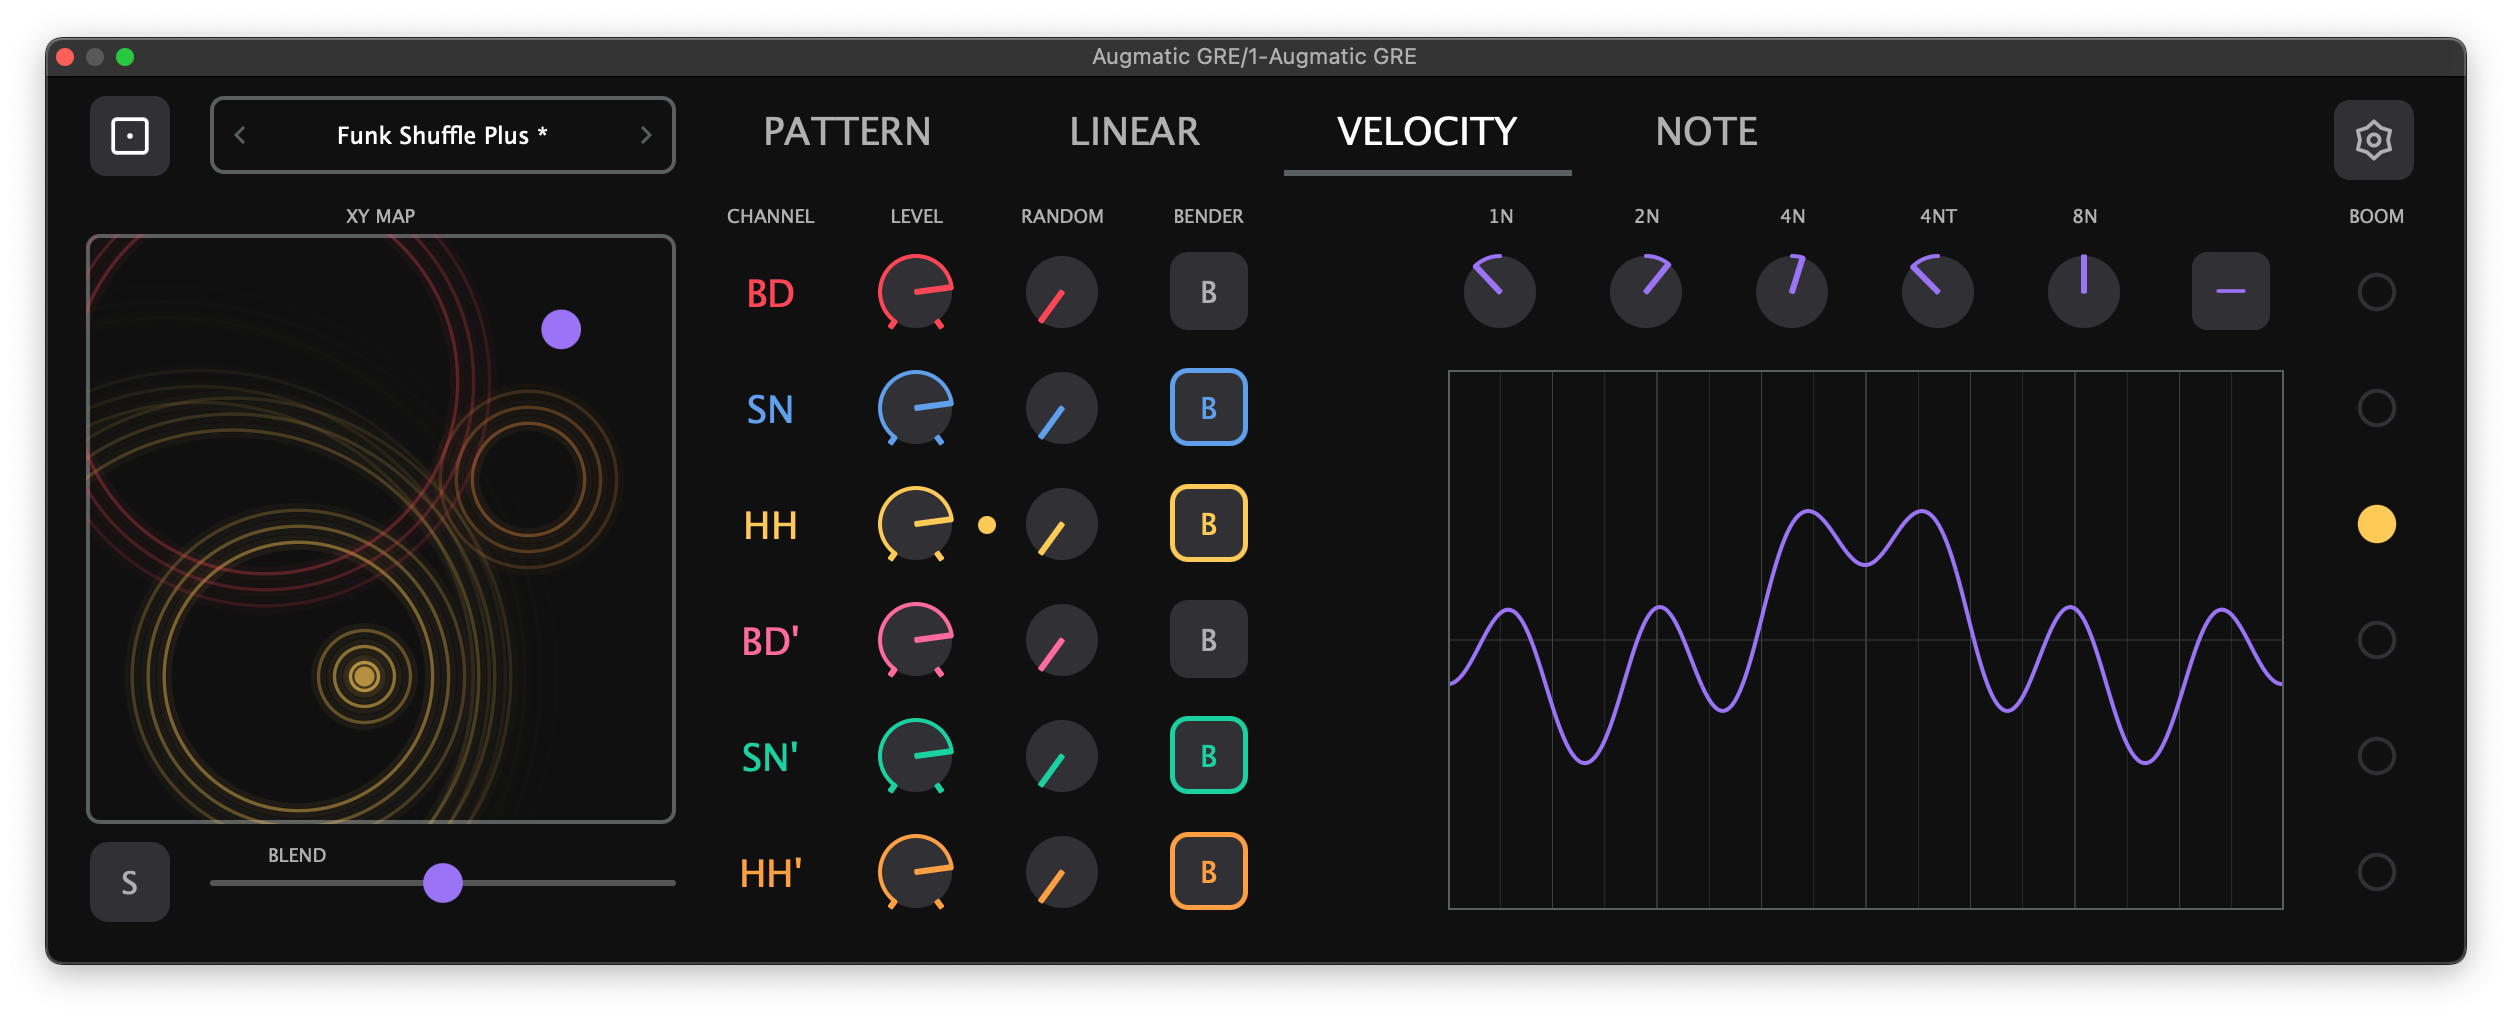
LEVEL
A per-channel velocity value that replaces the engine's velocity entirely. Whatever velocity the Topographic or Euclidean engine produces is discarded; the LEVEL value is used instead.
- Range: 0–127 (0 = mute)
- Default: 120 for all channels
Setting LEVEL to 0 mutes the channel. Per the MIDI specification, velocity 0 means Note Off — no MIDI note is sent. This mutes the channel after a pulse was passed through by LINEAR DRUMMING.
Velocity Randomization
Per-channel crossfade between the fixed LEVEL velocity and fully random velocity (0–127).
- Range: 0–100%
- Default: 0% (no randomization — uses LEVEL as-is)
- 0%: Output velocity equals LEVEL exactly
- 50%: Output velocity is halfway between LEVEL and a random 0–127 value
- 100%: Output velocity is fully random (0–127), regardless of LEVEL setting
Velocity Bender
The Velocity Bender modulates velocity using a bar-synchronized LFO. It creates dynamic "breathing" accent patterns that evolve over time.
Instrument Enable Buttons
Each instrument row has a B (Bender) toggle button. Tap to enable or disable the Velocity Bender for that channel. All are enabled by default. Disabled instruments bypass the Velocity Bender and keep their LEVEL velocity.
Beat Division Knobs
Five bipolar knobs control how strongly each beat division contributes to the LFO curve:
| Knob | Beat Division | Description |
|---|---|---|
| 1N | Whole note | Slow one-bar velocity sweep cycle |
| 2n | Half note | Slow, wide modulation over 2 beats |
| 4n | Quarter note | Pulse-aligned modulation on every beat |
| 4nt | Quarter-note triplet | Triplet feel — 3 cycles per 2 beats |
| 8n | Eighth note | Fast modulation, twice per beat |
Each knob ranges from -1.0 to +1.0 with 0.0 at center (no modulation). Positive values create peaks, negative values create troughs at that division. The five components are blended into a single smooth LFO curve.
Waveform Display and Buttons
A real-time waveform display shows the combined LFO shape, updated at 30 FPS as you adjust knobs. Grid lines mark beat divisions for visual reference.
- Randomize — randomizes all five knobs
- Reset — returns all knobs to center (0.0)
The Velocity Bender is the final velocity processing stage before MIDI output. It multiplies the LEVEL velocity by the LFO value, so the modulation is proportional.
Beat Monitor on the Velocity Tab
A Level dot per channel (between the LEVEL and RANDOM columns) provides visual feedback on the final velocity outcome:
- Instrument color — the note passed with a velocity greater than zero
- Gray — the note was blocked (final velocity = 0, which acts as a mute per the MIDI specification)
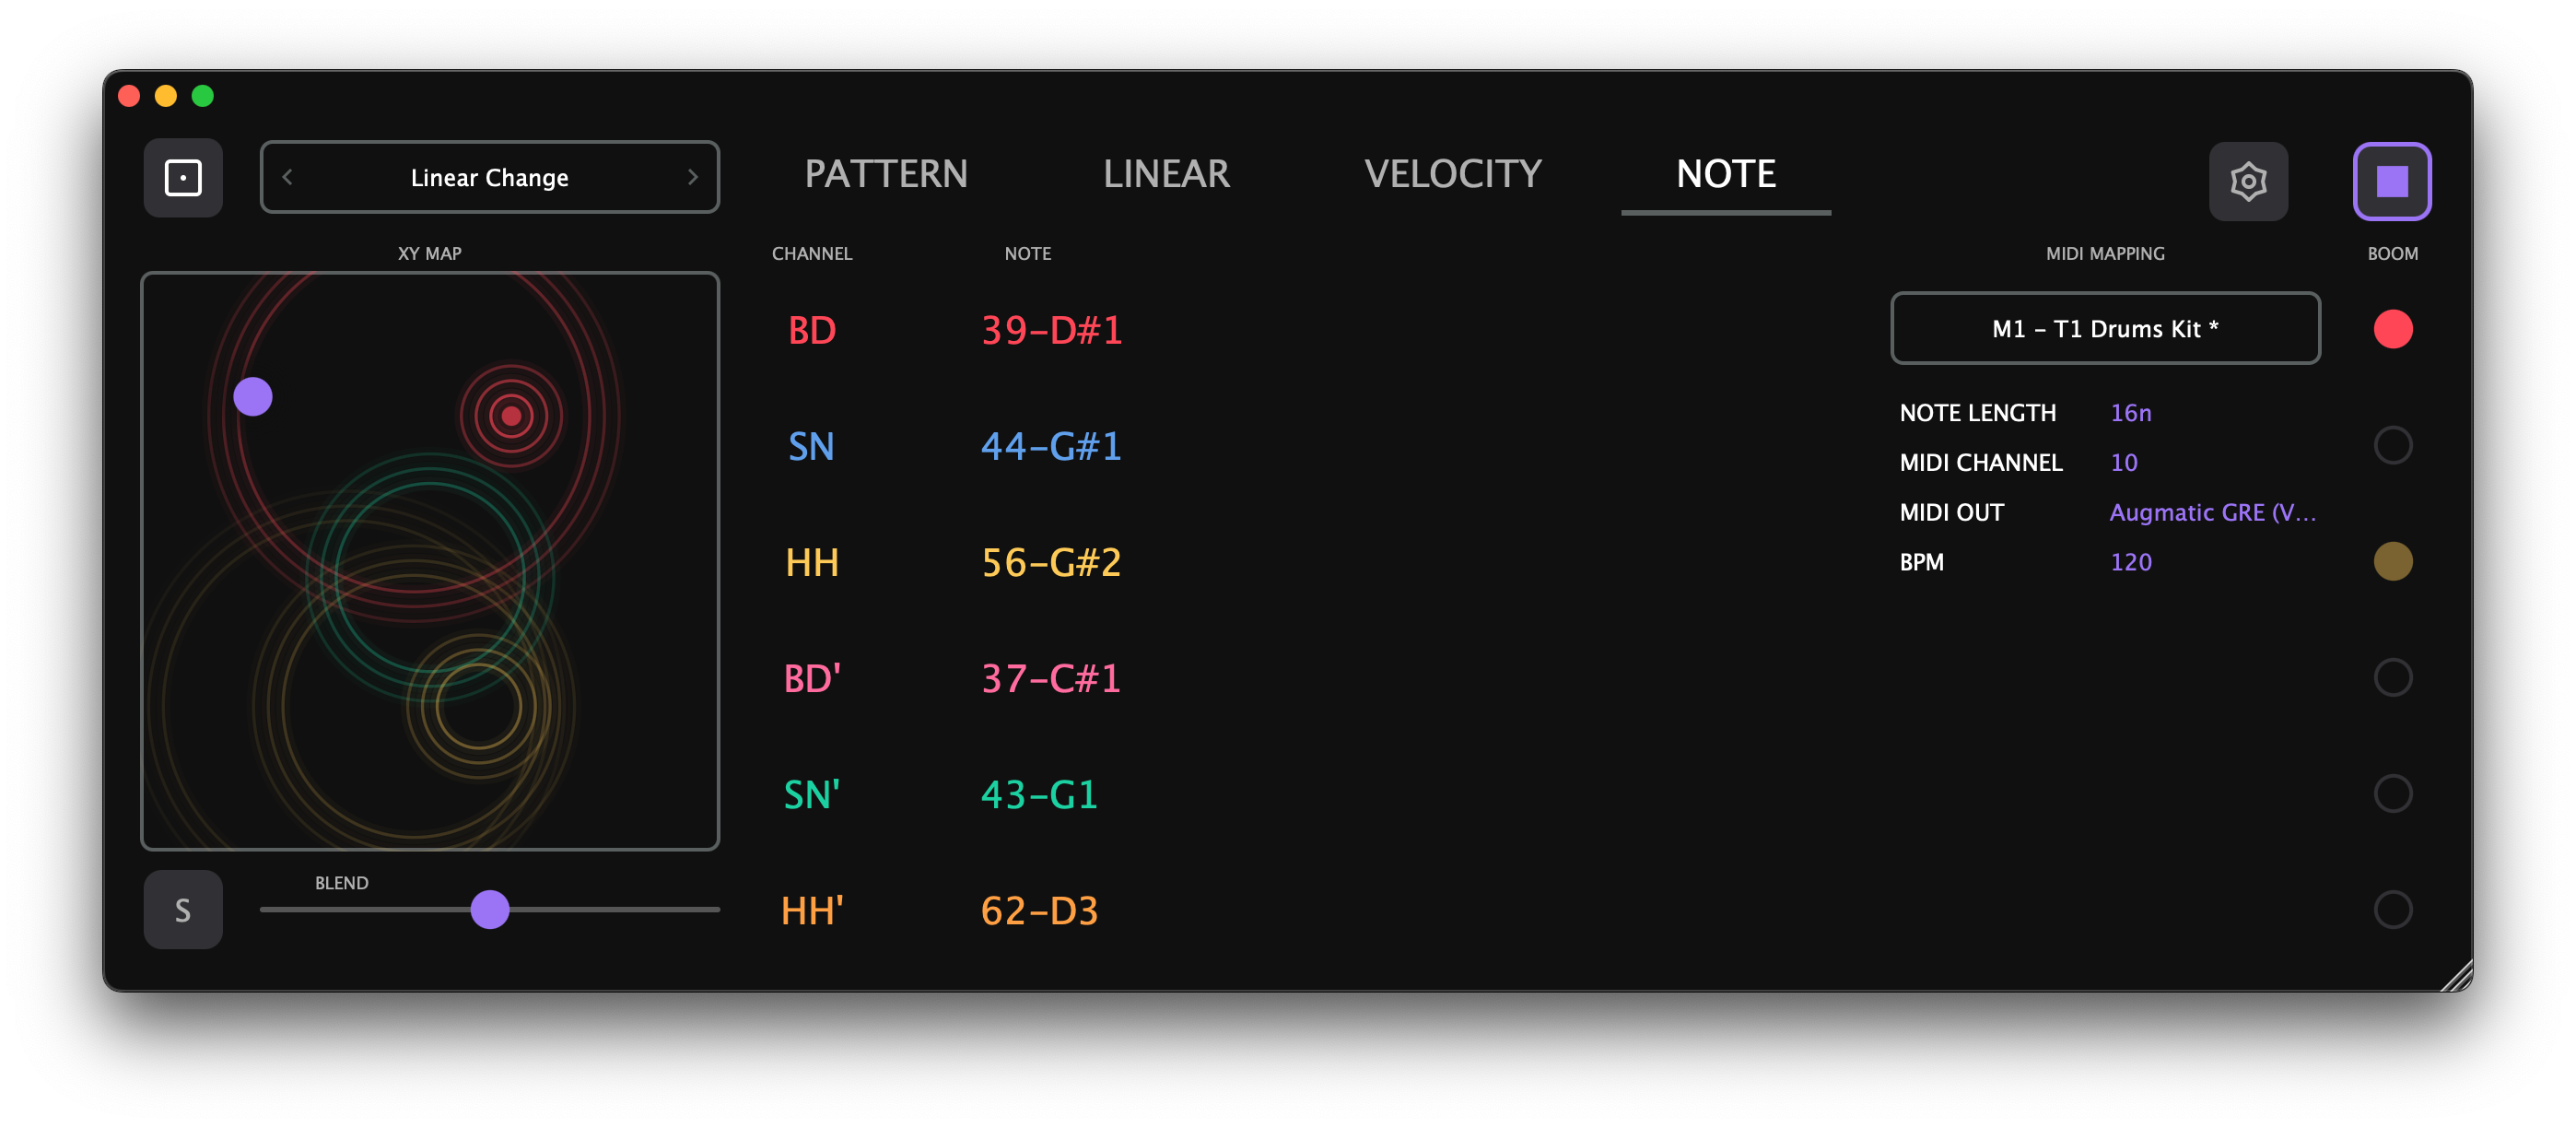
Note Tab
The NOTE tab manages MIDI note assignments and MIDI mappings. These settings are independent from presets — loading a preset does not change MIDI notes, and loading a mapping does not change pattern settings.
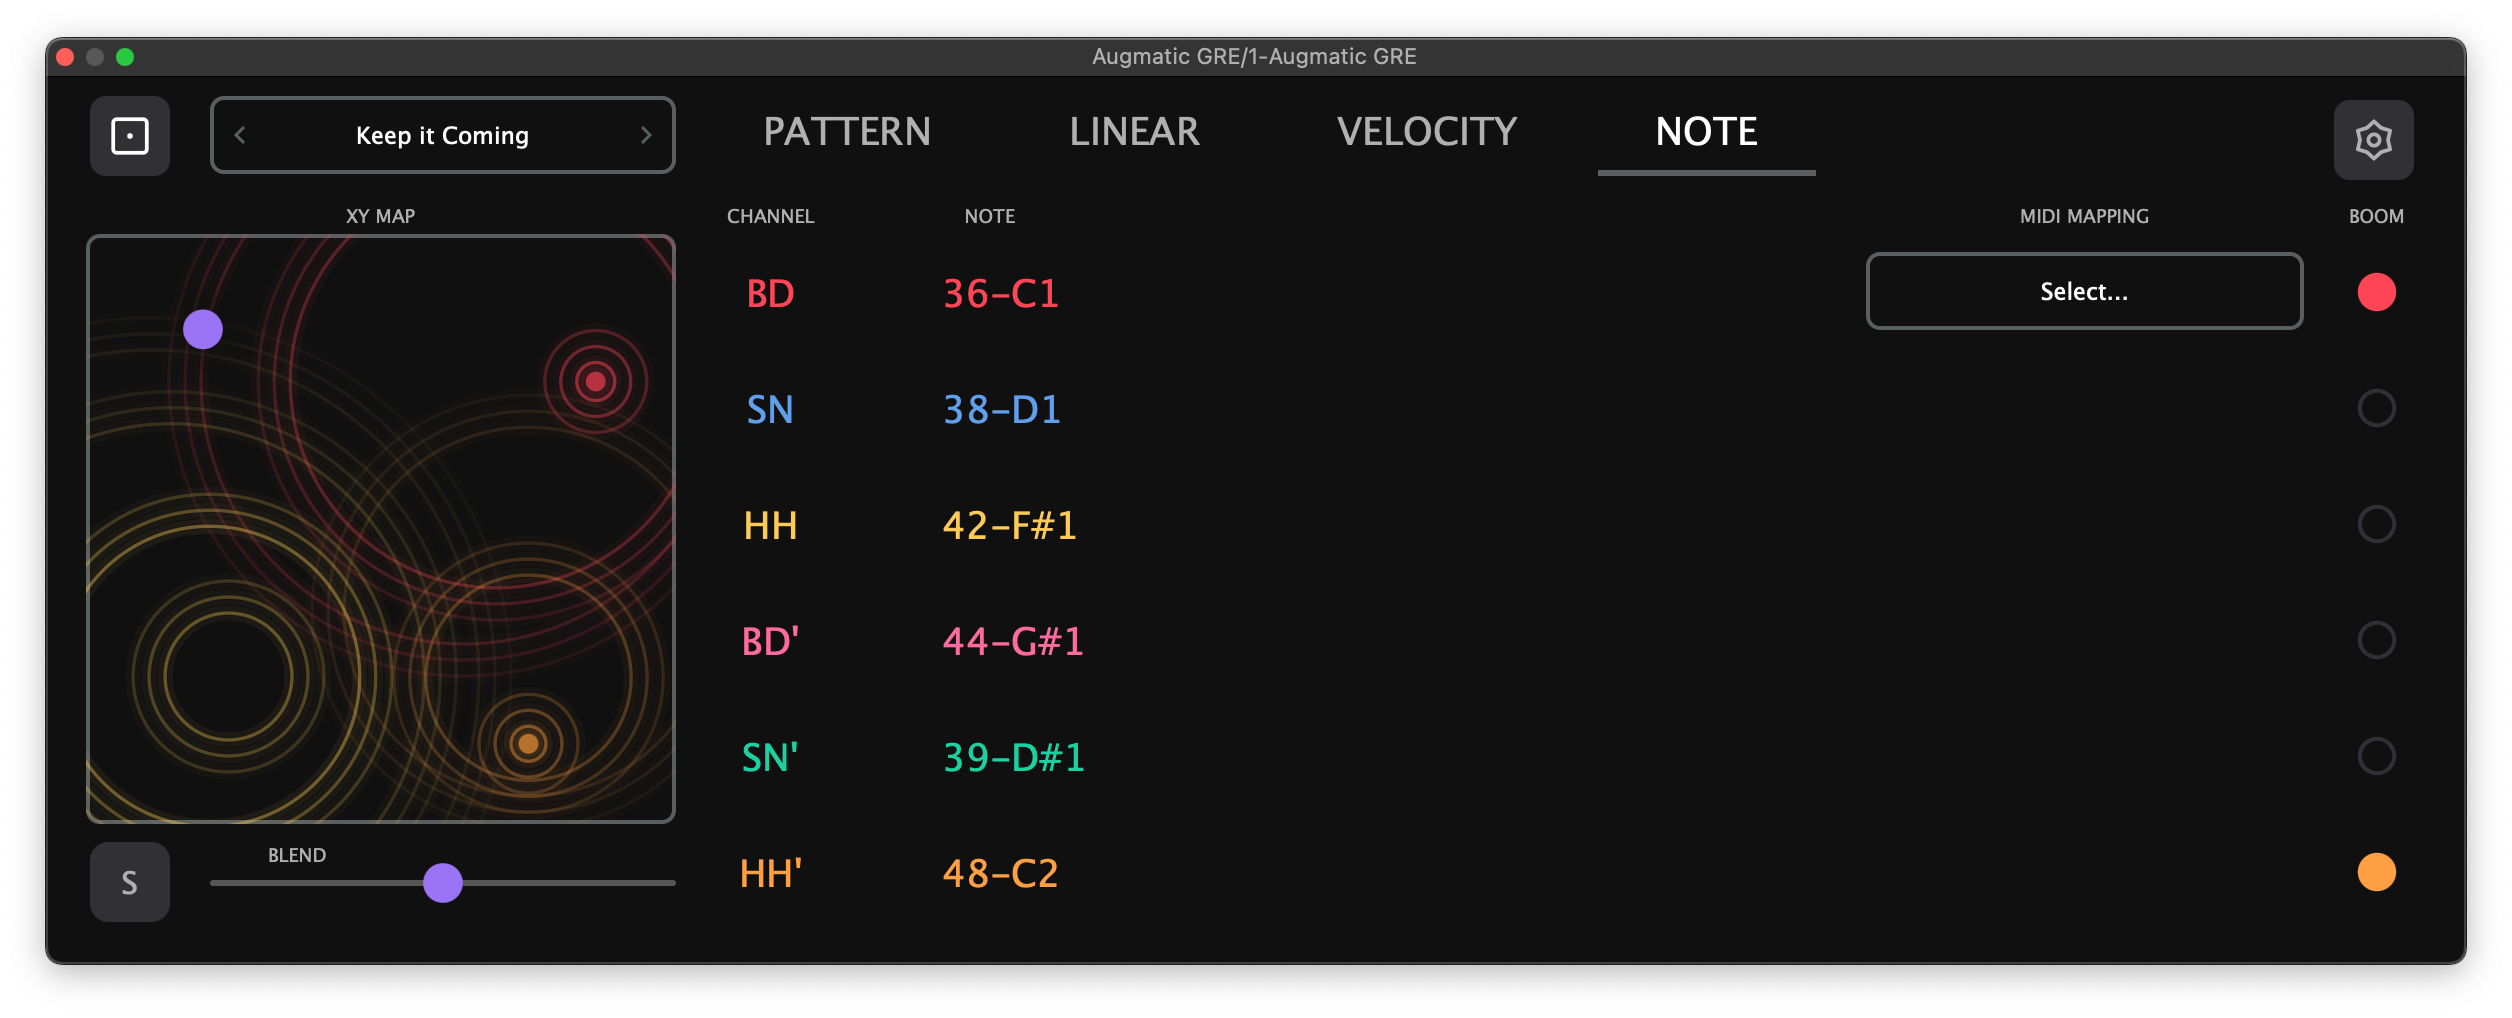
MIDI Note Assignment
Each channel has a NOTE column displaying the assigned MIDI note as both number and name (e.g., “36-C1”, “42-F#1”). Drag vertically to scroll through all 128 MIDI notes (C-2 through G8). The list supports kinetic scrolling — a fast swipe coasts through values with momentum. Values commit on finger release. Double-tap to reset to the default note.
Note assignments are stored in MIDI mappings, not presets. Changing the note marks the current mapping as modified (asterisk indicator).
On iPad and iPhone, hold an LED pad while scrolling the NOTE column to audition each note as you scroll through.
NOTE Tab Controls
The right side of the NOTE tab (below the MIDI Mapping menu) contains additional playback and output controls:
- NOTE LENGTH — Duration of generated MIDI notes: 4n (quarter note), 8n, 16n, 32n, or 64n. Shorter values work best for drum triggers; longer values suit melodic instruments.
- MIDI CHANNEL — Output channel 1–16, default 10 (GM Drums). All six instrument channels share the same output channel. Available in all modes (AUv3, VST3, standalone).
- MIDI OUT (standalone mode only) — Select the MIDI output device: a virtual port for routing to other apps, or a hardware MIDI interface.
- BPM (standalone mode only) — Internal tempo, 40–240 BPM. Drag vertically to change. In AUv3/VST3 plugin mode, BPM is provided by the host DAW.
NOTE LENGTH is saved in presets. MIDI CHANNEL, MIDI OUT device, and BPM are persisted independently (not affected by preset changes).
MIDI Mapping System
MIDI mappings store note assignments independently from presets. This means you can load different presets (pattern settings) while keeping the same note assignments for your drum machine.
Tap the MIDI Mapping Manager button on the NOTE tab to open the browser. The browser has a 3-column folder view with an action panel on the left and an info panel on the right:
- Open — load the selected mapping
- Save — overwrite the currently loaded mapping
- Save As — save to a new file (enter name in the header editor)
- Rename — rename the selected file or folder
- New Folder — create a subfolder for organization
- Delete — delete the selected file or folder (confirmation required)
- Favorite — mark files as favorites for quick access via the Show Favorites toggle
The info panel (rightmost column) shows the selected file’s Author and Description metadata. Tap the edit icon to modify metadata for user mappings (factory items are read-only).
Use Keep Open to audition mappings without closing the browser. Use < / > chevron arrows in the menu bar for quick navigation.
A modification indicator (asterisk) appears on the MIDI Mapping panel when any note assignment has been changed since last save or load.
Factory Mappings: Built-in mappings for many popular apps and hardware instruments are auto-installed on first launch. Includes mappings for Koala Sampler, Logic Pro, Cubasis, TR-808, TR-909, Ruismaker, and many more. Factory items cannot be modified or deleted.
Settings
Settings is accessed via the gear icon in the tab bar. It opens as a floating window with three panels:
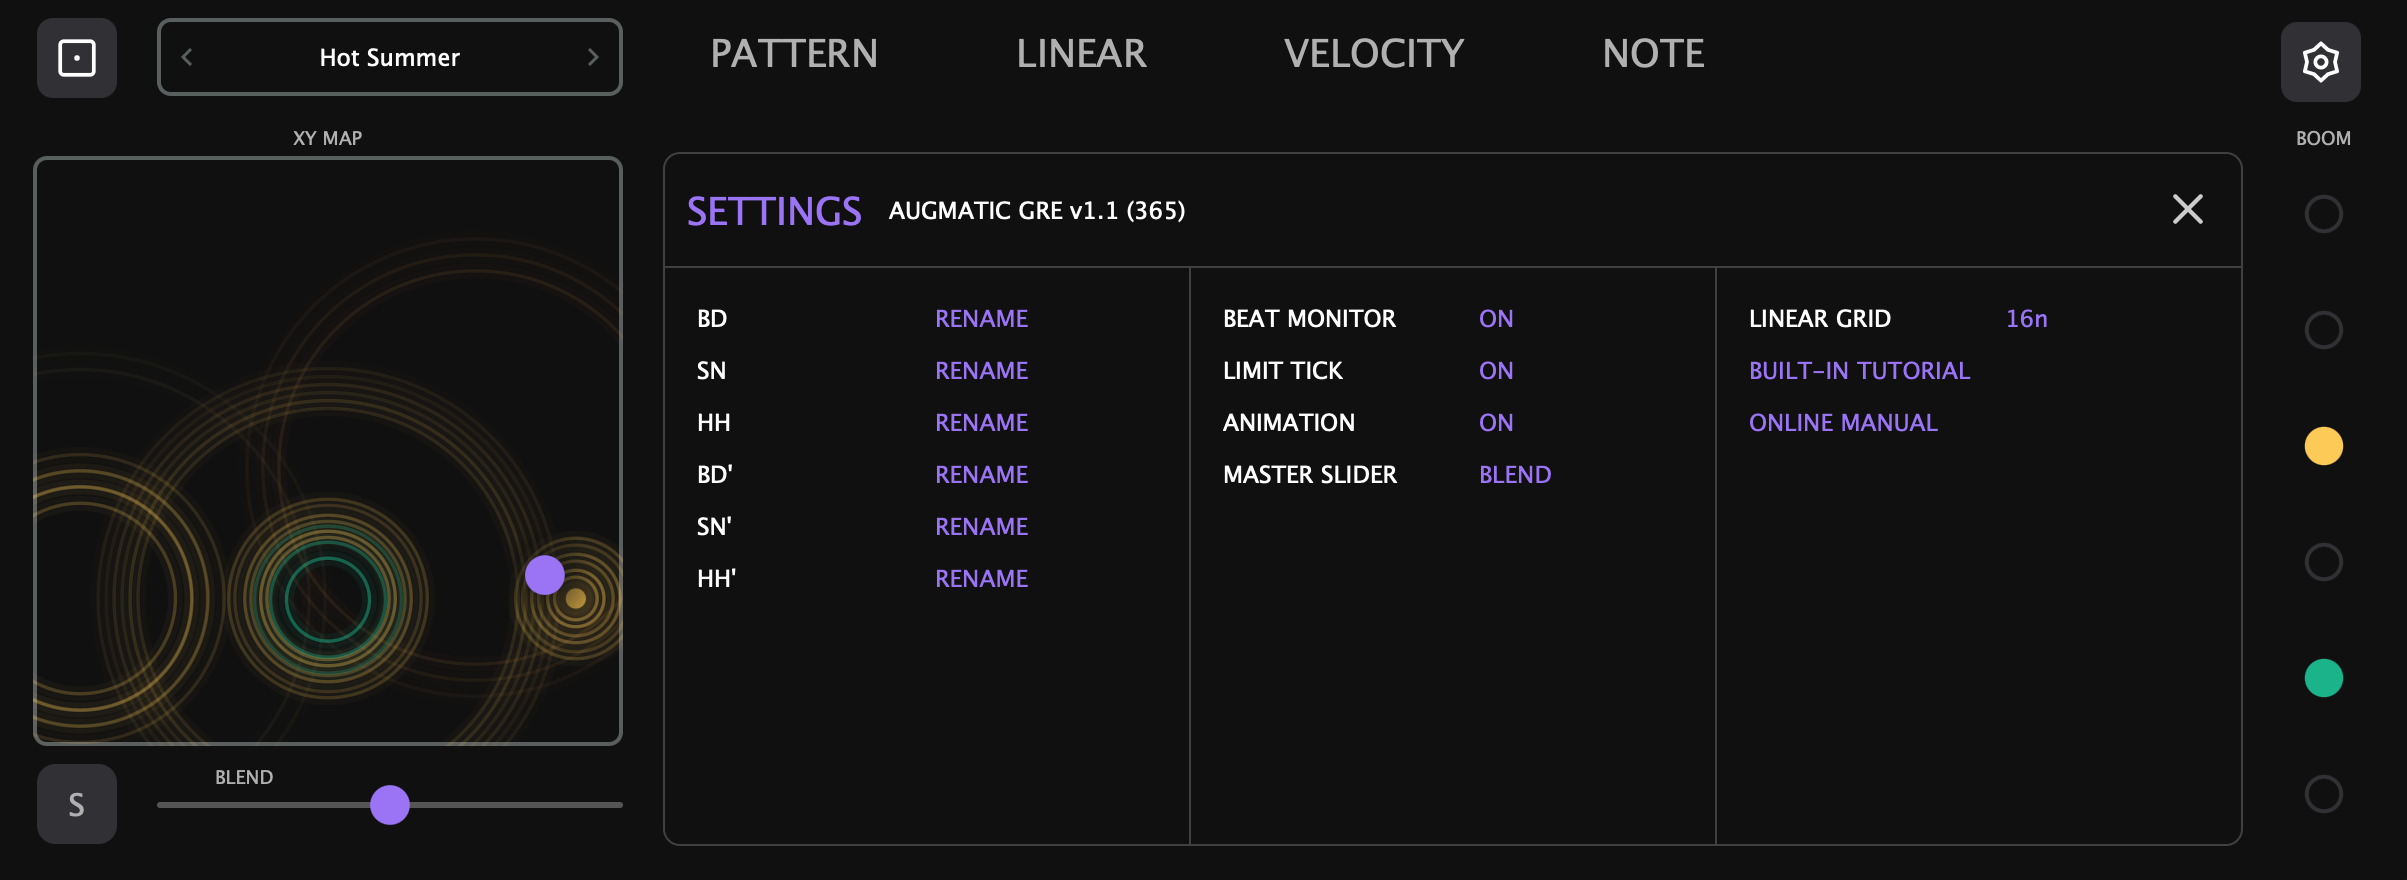
- Column 1 — rename channel display labels (custom names are stored in MIDI mappings)
- Column 2 — Beat Monitor, Limit Tick, Animation toggles; Master Slider selection. Limit Tick shows two small marks on each knob arc indicating the effective range set by the Master Slider — toggle this off to hide them.
- Column 3 — Linear Grid (muting window length), BUILT-IN TUTORIAL (opens the interactive tutorial), and ONLINE MANUAL (opens this manual in your browser).
Preset System
Presets store all pattern, timing, velocity, and mix settings. They do NOT store MIDI note assignments (those are managed separately by MIDI Mappings).
Preset Browser
Tap the Preset Manager button at the top-left of the interface to open the browser. The browser has a 3-column folder view with an action panel on the left and an info panel on the right:
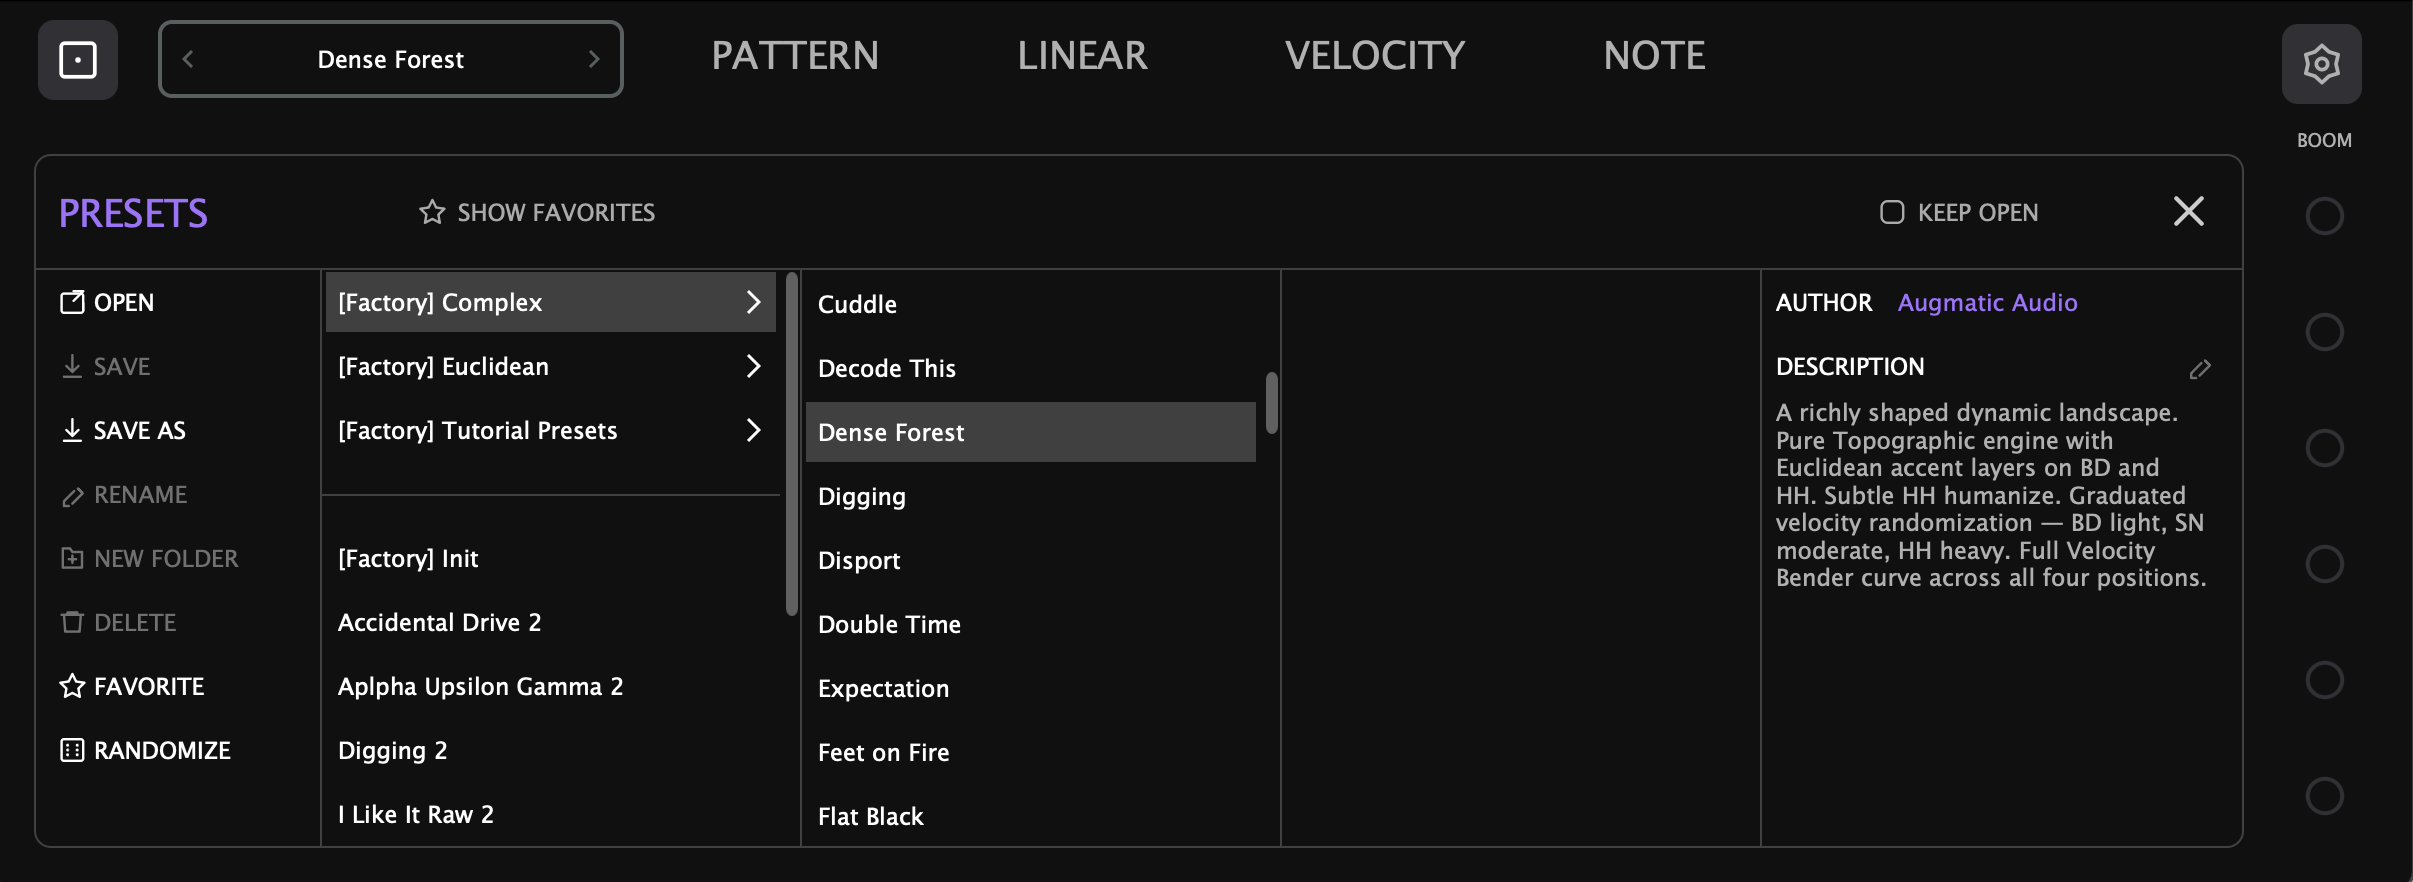
- Open — load the selected preset
- Save — overwrite the currently loaded preset
- Save As — save to a new file (enter name in the header editor)
- Rename — rename the selected file or folder
- New Folder — create a subfolder for organization
- Delete — delete the selected file or folder (confirmation required)
- Favorite — mark files as favorites for quick access via the Show Favorites toggle
- Randomize — generate random values for all parameters (MIDI note assignments are excluded)
The info panel (rightmost column) shows the selected file’s Author and Description metadata. Tap the edit icon to modify metadata for user presets (factory items are read-only).
Use Keep Open to audition presets without closing the browser. Use < / > chevron arrows in the menu bar for quick navigation.
Factory vs User Presets
- Factory presets ship with the plugin — cannot be modified, renamed, or deleted
- User presets are stored as XML files and can be saved, deleted, renamed, and shared
- A modification indicator (asterisk) appears when the current preset has been edited since loading
Presets are saved to the User Presets folder. See File Storage for the location on each platform.
What Presets Include
| Included | Not Included |
|---|---|
| Density, Chaos, Map XY | MIDI note assignments |
| Euclidean Steps/Pulses/Start On | MIDI channel (default Ch 10, configurable in standalone) |
| Blend, Swing, Shift, Humanize | MIDI output device |
| Clock Divider ratios | Custom instrument names |
| Velocity LEVEL, Randomization | |
| Velocity Bender settings | |
| Linear Drumming Matrix assignments | |
| Mute/Solo/Probability states | |
| Linear Grid, Note Length |
MIDI Signal Flow
The complete signal path from pattern generation to MIDI output:
DAW Automation
All 135 parameters are exposed to your DAW for automation.
| Group | Parameters | Per Channel |
|---|---|---|
| Pattern Morphing | Map X, Map Y | Global |
| Density | BD/SN/HH/BD'/SN'/HH' | Yes |
| Chaos | Master + 6 individual | Yes |
| Blend | XY Map/Euclidean mix | Yes |
| Euclidean | Steps, Pulses, Start On | Yes |
| Swing | Timing offset | Yes |
| Shift | Time delay | Yes |
| Humanize | Random timing | Yes |
| Clock Ratio | Tempo multiplier | Yes |
| Velocity Level | Output velocity | Yes |
| Velocity Random | Randomization amount | Yes |
| Velocity Bender | Enable + 4 knobs | Per-instrument + global |
| Probability | Probability Pre, Probability Post | Yes |
| Mute | Mute Pre, Mute Post | Yes |
| Solo | Solo Pre, Solo Post | Yes |
| Priority | Level 1–6 | Yes |
| MIDI Notes | Note number | Yes |
| Note Length | Length | Global |
| Linear Grid | Duration | Global |
Standalone Mode
Augmatic GRE can run as a standalone app on both macOS and iPad, independent of any DAW. In standalone mode, the app provides its own internal clock and MIDI output routing. The standalone mode is sufficient to control one drum sampler or synthesizer, but for setups which include several time-synchronized instruments, we recommend using a host app which will manage clock synchronization, MIDI CC mapping etc.
AUv3 vs Standalone
| Feature | AUv3 Plugin | Standalone App |
|---|---|---|
| Transport | Controlled by the host DAW — Play/Stop, timeline position | Internal Play/Stop button and Spacebar shortcut (macOS) |
| BPM | Synced from host — no BPM control visible | Adjustable on NOTE tab (40–240 BPM) |
| MIDI Output | Routed through the host's MIDI bus | Selectable on NOTE tab — virtual port or hardware MIDI device |
| MIDI Channel | Selectable on NOTE tab (1–16, default 10) | Selectable on NOTE tab (1–16, default 10) |
| Play/Stop button | Hidden — host controls transport | Visible in the tab bar, above the LED column |
| DAW Automation | All 135 parameters exposed to host | Not available |
Standalone Transport Controls
In standalone mode, the app has its own transport since there is no host DAW to provide one:
- Play/Stop button — appears in the tab bar, above the LED column. Click to start/stop the internal clock. This button is not available when running as an AUv3 or VST3 plugin.
- Spacebar shortcut (macOS) — toggles playback
In AUv3 mode, transport is fully controlled by the host: press Play in your DAW and Augmatic GRE starts generating patterns. BPM, timeline position, and play/stop state all sync automatically.
Standalone NOTE Tab Controls
The NOTE tab shows additional controls in standalone mode that are not visible when running as an AUv3 plugin:
| Control | Description |
|---|---|
| BPM | Internal tempo, 40–240. Drag vertically to change. |
| MIDI OUT | Select output device: virtual port or hardware MIDI. |
MIDI CHANNEL (1–16, default 10) is always visible on the NOTE tab in all modes. BPM is saved in presets but only used in standalone mode. MIDI channel and output device are persisted independently.
File Storage
Presets and MIDI mappings are stored as XML files in platform-specific directories. Factory content (shipped with the app) and user-created content are kept in separate subdirectories so that app updates never overwrite or delete your custom presets.
iOS / iPadOS
On iOS, presets and MIDI mappings are stored in the app's Documents directory, visible in the Files app under On My iPad > Augmatic GRE.
- Factory Presets:
Documents/Presets/Factory/ - User Presets:
Documents/Presets/User/ - Factory MIDI Mappings:
Documents/MIDI Mappings/Factory/ - User MIDI Mappings:
Documents/MIDI Mappings/User/
You can browse, copy, and share these files directly from the iOS Files app. To import a preset someone shared with you, simply drop the XML file into the appropriate User/ folder.
AUv3 — Files App Access
When running as an AUv3 plugin inside a host (AUM, Cubasis, Drambo, etc.), the plugin needs permission to access the standalone app's Documents folder. On first use, a blue “Enable Files App Access” button appears at the top of the plugin interface.
- Tap the button
- A folder picker opens, pre-navigated to the Augmatic GRE Documents folder
- Tap Open to grant access
After this one-time setup, presets you save in the AUv3 are immediately visible in the Files app — no need to launch the standalone app. The permission persists across app restarts and device reboots.
If you skip this step, the AUv3 still works normally but uses an internal storage area not visible in the Files app.
macOS
- Factory Presets:
~/Library/Application Support/AugmaticGRE/Presets/Factory/ - User Presets:
~/Library/Application Support/AugmaticGRE/Presets/User/ - Factory MIDI Mappings:
~/Library/Application Support/AugmaticGRE/MIDI Mappings/Factory/ - User MIDI Mappings:
~/Library/Application Support/AugmaticGRE/MIDI Mappings/User/
Windows
On Windows, all data is stored under the user’s Documents folder:
- VST3 Plugin:
C:\Program Files\Common Files\VST3\ - Factory Presets:
Documents\Augmatic Audio\Augmatic GRE\Presets\Factory\ - User Presets:
Documents\Augmatic Audio\Augmatic GRE\Presets\User\ - Factory MIDI Mappings:
Documents\Augmatic Audio\Augmatic GRE\MIDI Mappings\Factory\ - User MIDI Mappings:
Documents\Augmatic Audio\Augmatic GRE\MIDI Mappings\User\
Tips and Workflows
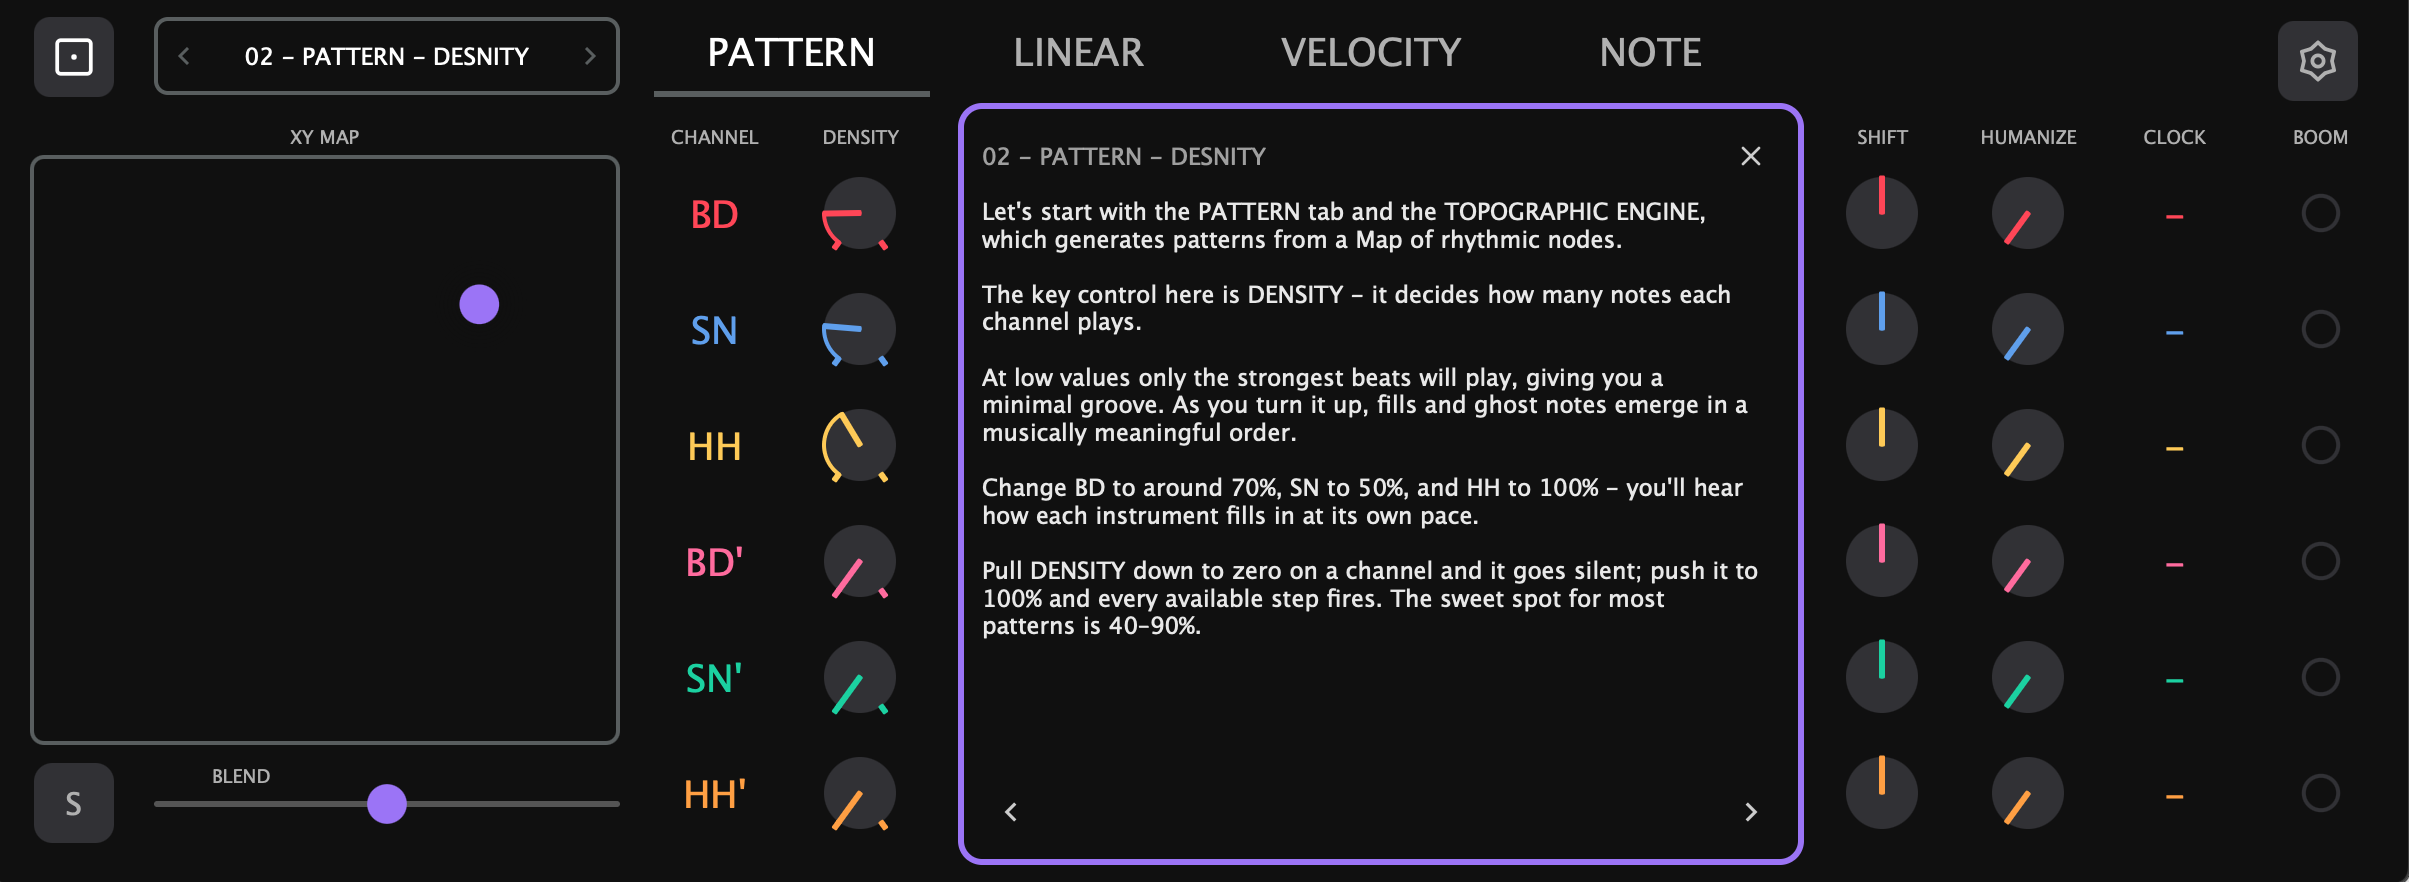
Density — Less is More
DENSITY controls how many notes each channel plays. At low values only the strongest beats come through. As you turn it up, fills and ghost notes emerge in a musically meaningful order. The sweet spot for most patterns is 40–90%.
- Set BD to around 70%, SN to 50%, HH to 100%
- Listen to how each instrument fills in at its own pace
- Dial back to taste — pull DENSITY to zero to silence a channel, push to 100% and every available step fires
Chaos — Controlled Randomness
CHAOS adds variation to the Topographic Engine. At 0% the pattern repeats identically every loop. Around 50% you get human-like variations. Past 80% you enter experimental territory.
- Start with CHAOS at 0% for a locked, mechanical groove
- Raise to 10–20% for subtle, living variation
- Push past 50% for noticeable surprises each bar
- Watch the Beat Monitor dot next to the CHAOS knob — it flashes whenever randomness adds a note
Accent Channels — Complementary Rhythms
The accent channels (BD', SN', HH') share the same XY Map position but have independent DENSITY and CHAOS. They naturally produce the in-between hits that main channels skip.
- Assign accent channels to different sounds — BD on kick, BD' on rimshot; SN on snare, SN' on clap
- Keep accent densities low (10–25%) so they complement rather than compete
- Give accents lower priority (4–6) so they yield to main hits
- Use the Velocity Bender to modulate accent velocity over time
Odd Pulse Counts — World Music Flavors
The Euclidean algorithm spaces pulses as evenly as possible, which naturally avoids sounding random. Odd pulse counts create instant world music flavors.
- Set BLEND to 100% Euclidean on the channels you want to experiment with
- Try 5 PULSES in 16 STEPS on BD for a Latin rumba-like pattern
- Change to 7 PULSES for a dense, syncopated polyrhythm
- Try different PULSE counts on BD, SN and HH independently
Start On — Instant Syncopation
START ON controls which step the Euclidean pattern begins on, shifting the entire pattern to create syncopation.
- Set a straight snare pattern: STEPS=16, PULSES=2
- Change START ON to hear the snare land in unexpected places while the kick stays anchored
- Each START ON position gives a completely different groove character
- Watch the Beat Monitor dot — it flashes once per cycle to show where the Euclidean loop restarts
Steps — Polyrhythmic Magic
Using different step counts per channel creates patterns that evolve over many bars before repeating.
- Keep BD at 16 STEPS
- Set SN to 12 STEPS
- Set HH to 7 STEPS
- Because each channel loops at a different length, the combined pattern constantly shifts into complex, evolving polyrhythms
Combined with different Clock Divider ratios, this creates even more complex polyrhythmic textures.
Blend — Best of Both Worlds
BLEND mixes between Topographic (left) and Euclidean (right) per channel. At 50%, each note is randomly chosen from either engine.
- BD on Topographic, HH on Euclidean: Set BD Blend to 0.0 for natural kick patterns, HH Blend to 1.0 for mechanical precision
- Subtle life: Set Blend just slightly below 100% Euclidean — the Topographic Engine subtly replaces or adds notes, keeping the groove alive
- Gradual transition: Automate Blend from 0.0 to 1.0 over several bars
- Random switching: Set Blend to 0.5 for each note to randomly come from either engine
Master Blend Slider — One-Gesture Morphing
The Master Blend slider controls all per-channel BLEND knobs simultaneously.
- Set up different BLEND values per channel
- In Soft mode, the slider scales each channel proportionally
- In Hard mode, it overrides all channels to the same value
- Sweep the Master Slider to morph the entire kit between Topographic and Euclidean in one gesture — perfect for live performance
Swing — Shuffle Feel
SWING delays off-beat 16th notes. It only works on 16th-note resolution — a pattern playing only quarter notes won’t swing.
- Set HH to play all 16 pulses (STEPS=16, PULSES=16)
- Apply positive SWING for classic shuffle, negative for a rushing, urgent feel
- Keep BD SWING at 0 while swinging HH for that classic hip-hop groove
Shift — Flam Effects
SHIFT moves notes forward or backward in time. Small offsets from center create flam-like effects — two hits played almost together for a thicker, wider stroke.
- Keep the main channel (e.g., SN) with SHIFT at center
- Set the accent channel (SN') with a small SHIFT offset to the left (slightly early)
- The accent arrives just before the beat, creating a natural-sounding flam that adds weight to the hit
Humanize — The Human Touch
HUMANIZE adds random micro-timing offsets to each note. Pairs especially well with low CHAOS values.
- Set all channels to 15–20% for warm, natural grooves
- For more character, use different amounts per channel — HH at 25% for loose feel, BD at 5% for a tight foundation
- Higher values (50%+) create loose, drunken timing
Clock Divider — Speed Layers
The CLOCK knob changes playback speed per channel independently, from /8 (8x slower) to x8 (8x faster).
- Set HH to x1.5 for a triplet-over-straight polyrhythm
- Set an accent channel to /2 for sparse accents every other bar
- Keep BD and SN at x1 (normal) as the rhythmic anchor
Linear Drumming — Clean Grooves
Use the Linear Drumming Matrix to create patterns where only one voice plays at a time:
- Assign SN to Priority 1, BD to Priority 2, HH to Priority 3
- Set Linear Grid to 16n or 8n
- When notes collide, only the highest-priority instrument plays
- Lower-priority instruments are silenced for the grid duration
Watch the Beat Monitor matrix — cells fill with color when notes pass through, gray blinks show where a higher-priority instrument blocked a note.
Probability Pre — Organic Gaps
PROB PRE filters notes randomly before the priority matrix. Removed notes are as if they never existed — other instruments fill those spots naturally.
- Lower BD PROB PRE to 60–75%
- Gaps get filled organically by other instruments through the priority matrix
- Great for evolving, generative patterns that never feel static
Probability Post — Breakbeat Stutter
PROB POST filters notes after the priority matrix — creating actual silence in your pattern. No instrument fills in.
- Set all channels to 50% PROB POST
- Random holes appear in the groove for a stuttering, breakbeat-like feel
- Unlike PROB PRE, these gaps stay empty, creating rhythmic breathing space
Mute and Solo — Isolate and Compare
SOLO PRE isolates the raw pattern; SOLO POST shows what survived priority filtering. Use them to understand how priority resolution shapes your groove.
- Enable SOLO PRE on a channel to hear its full generated pattern
- Switch to SOLO POST to hear only the hits that survived priority
- Compare the two to understand exactly where priority is shaping the groove
Velocity Level — Dynamic Balance
LEVEL sets the velocity (intensity) of each channel’s notes. Setting LEVEL to 0 mutes the channel entirely.
- Set BD LEVEL high (110–127) for a punchy kick
- Set SN LEVEL low (60–80) for ghost-note patterns
- Set HH LEVEL medium (90–100) for balance
Velocity Random — Dynamic Variation
RANDOM crossfades between the fixed Level value and fully random velocity.
- Set HH RANDOM to 30–40% for a natural, expressive hi-hat
- Keep BD and SN RANDOM at 5–10% for solid, consistent foundation
- At 100%, velocity is fully random regardless of LEVEL
Velocity Bender — Rhythmic Breathing
The Velocity Bender modulates velocity with a bar-synchronized LFO across five beat divisions.
- Start with the 4nt (quarter triplet) and 8n (eighth note) knobs — these create the most rhythmic, danceable velocity patterns
- Mix positive and negative values across divisions for complex, evolving dynamics
- Watch the waveform display to see the combined LFO shape in real time
- Use BENDER buttons to select which channels are affected
Creating Evolving Patterns
Automate X and Y coordinates over 8–16 bars to morph through different pattern styles. Start with subtle movements near one grid point, then sweep across the full range for dramatic changes.
Combining Features for Character
The most expressive grooves come from combining subtle amounts of multiple features:
- Warm, living groove: Low Chaos (10–20%) + Humanize (15%) + slight Blend offset from 100% Euclidean
- World music polyrhythms: Euclidean steps + odd pulses + different Start On per channel
- Clean, evolving patterns: Linear Drumming + Prob Pre at 70% — never repeats exactly
- Dynamic, breathing drums: Velocity Bender + Random at 20%
Sparse and Generative Patterns
- Lower Probability Pre to 40–60% for all channels
- Set moderate Chaos (30–50)
- Use different Euclidean patterns per channel with odd step counts
- Set Linear Grid to 4n for pronounced priority gaps
- Enable Velocity Bender with random knob values